


My renovation: Tour co-editor Sophie's new en suite and find out what vital lessons she learned
In this new series, co-editor Sophie reveals the ups and downs of renovating her family home. Kicking off with the guest en suite – or is it a master en suite? Read on to find out…

They say renovating a home is one of the most stressful things you’ll ever do in your lifetime. So why I decided to renovate the guest en suite right before Christmas is beyond me. And why I then decided halfway through the project that actually, it should be mine and my husband’s space instead of the guest quarters right before said-guests arrived for Christmas is just madness, right?
To give you a bit of background about our family home renovation, my husband Charlie and I have been planning our project since September 2022. We, along with our two children Ada (8) and Lily (3) live in a 1930s semi-detached four-bed in West Norwood, south-east London, which we bought off a dodgy builder back in 2016 😡! We’ve got lots to fix (with the main problems being on the ground floor and exterior) and have been in discussions with architects since summer 2022. However with work/life getting in the way and, with us having to find a new architect (the first studio we hired sadly didn’t work out), it was starting to feel like our project was never going to get off the ground. So late last October we decided to bite the bullet and get the ball rolling on redecorating all the bedrooms and re-designing all the bathrooms on the first and second floors that weren’t going impacted by the eventual bigger renovations to the rest of the house. We decided to work top down, starting with the guest en suite at the very top of the house in the loft extension.
In an attempt to keep to a relatively low budget (we had £8,000 to spend), we kept the bathroom layout the same to avoid costs associated with moving the plumbing and kept labour and material costs low by tiling only the shower, floor and sink area, using paint on the rest of the walls. If we had had more budget we would have considered a wet room to make better use of the limited floor space, but sadly the cost to tank the entire room from floor-to-ceiling meant it just wasn’t an option for us!


The original en suite was sterile and lacking in character, so we knew we wanted to inject colour and warmth into the room. We chose Hoxton Bottle Green Gloss porcelain tiles to define the shower and sink area and, for the floor and skirting, we went with a beautiful Terrazzo Nouveau Ivory matt porcelain tile that, with its speckled pattern, adds a splash of colour and interest. Both tiles were sourced from Mandarin Stone. I’m a huge fan of pairing green and pink, so we opted for Farrow & Ball’s Setting Plaster for the walls and ceiling, even painting the light fittings, extractor fan, PVCu windows and woodwork in the same hue to create a cohesive look. It also meant we didn’t have to worry about cutting in corners which was a real time saver!

Another problem with the previous en suite was that the room was always cold and uncomfortable to use – especially during the winter months – because the towel radiator wasn’t emitting enough heat. Our plumber recommended installing a new radiator (with the correct heat output) with lockshield valves rather than thermostatic valves.

As we wanted the space to have a grown-up feel about it, we went with smart black fittings and fixtures including the shower enclosure, shower, tap, door handles, toilet roll holder, mirror and display shelving.
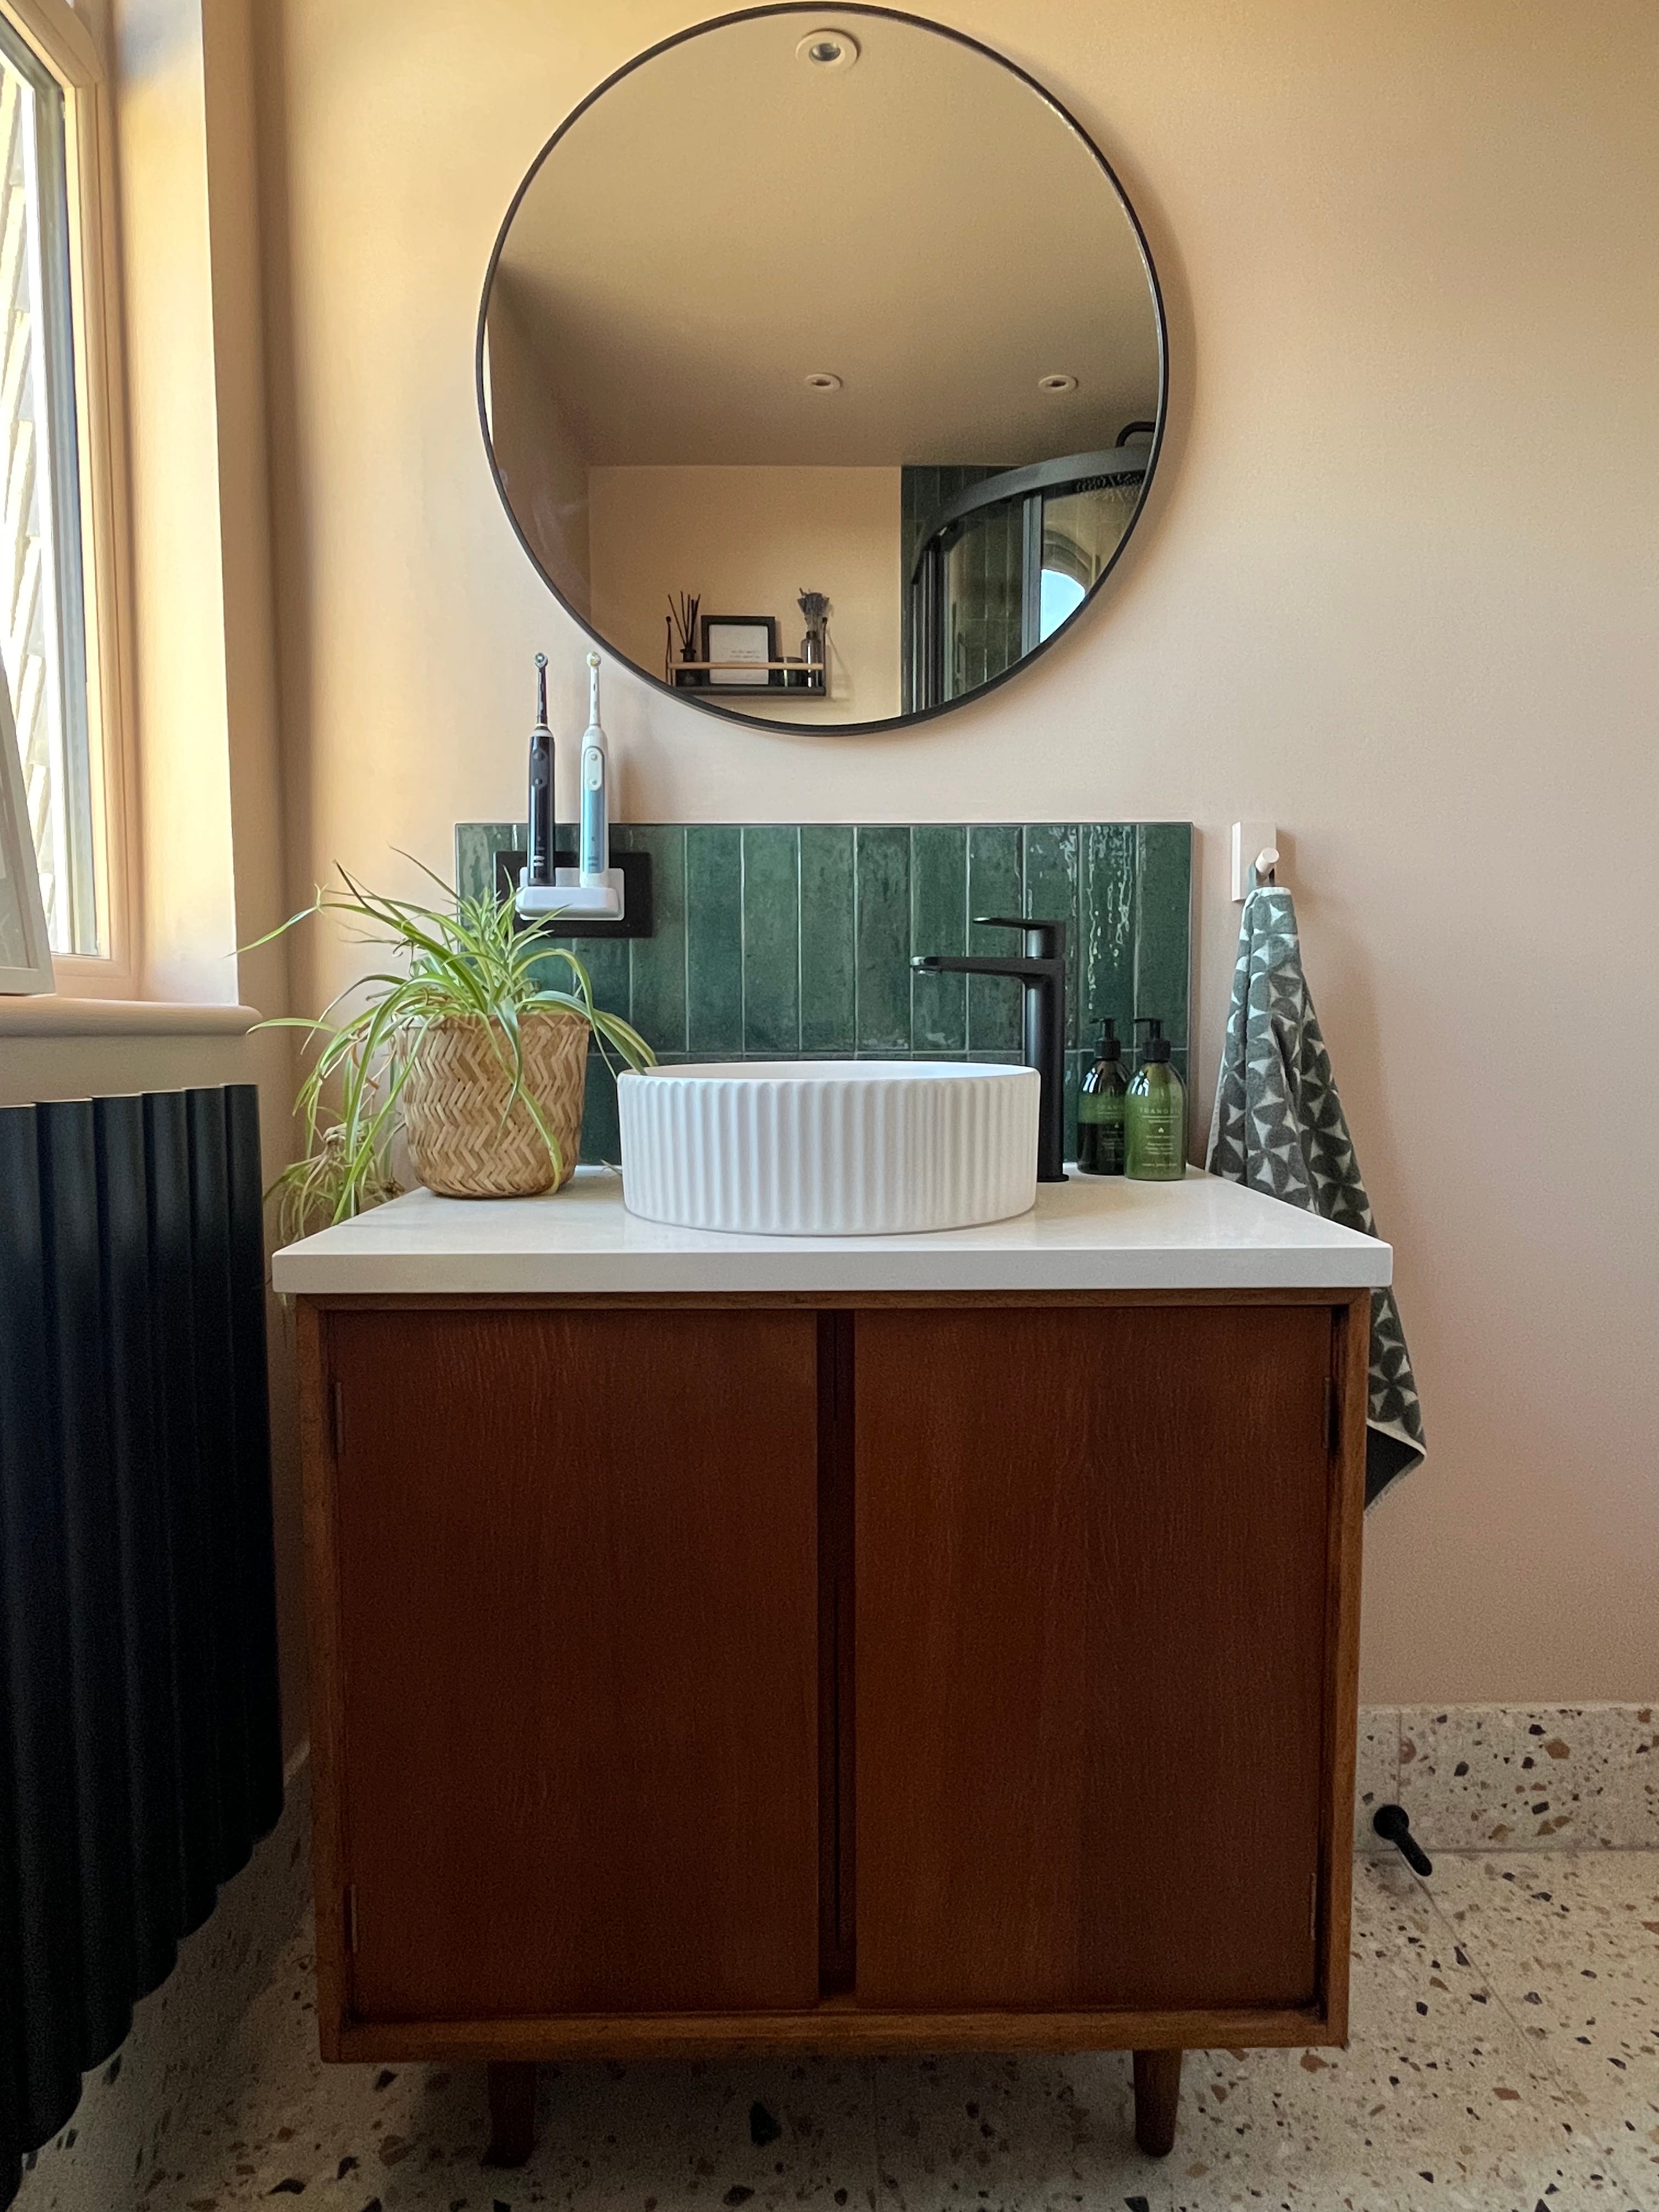
My favourite part of the reno has to be the vanity unit, which was a real labour of love. Hoping to add warmth to the room, I roped Charlie into helping me upcycle a 1950s Stag wooden cabinet, transforming it into a bathroom vanity with a quartz worktop and a fluted counter-top basin. I think I emitted from Charlie the amount of prep work that it would take (oops, my bad 😂). But, I do think the sweat, dust and tears were worth it for the finished look, plus it also provides ample storage for toiletries, towels and toilet rolls.


It wasn’t until halfway through ordering all the items that we realised just how ridiculous it was that we were designing (and spending so much money) on a bathroom that would only be used a handful of times a year by guests. So, in an attempt to reclaim some adult space we decided to take back the top floor of the house. This involved lots of late nights the week before Christmas (I think we were up until 2am most days) giving the adjoining bedroom (which had been the guest bedroom/home office) a fresh lick of paint, building in bespoke storage and creating a new home office area, too.
WHAT DID I LEARN FROM MY BATHROOM REFIT?
Order in lots of tile samples. Seeing the tile in real life will allow you to feel and see the texture, colour and finish in your space. Viewing it only on screen won’t really do it any justice. Plus, once you’ve chosen the finished tile, you can use the sample to match with paint colours, fixtures and fittings.
When choosing paint colours, paint swatches onto lining paper and hang them up in the bathroom. A paint colour can look beautiful on a sunny day, but not have the same impact at other times. You need to make sure you’re happy with how the hue looks by day and night.
Measure up and then measure up again. I got totally confused with how many tiles we needed. Thankfully our builder was more than happy to check my math and correct me where I went wrong! He also advised over ordering by 10% in case of any breakages and to allow for cuts, which was just as well as we only had 3 green wall tiles remaining at the end!
Find a project team you trust and who you gel with. We already knew our plumber Adam from A P Services and he recommended tradesman Roy, who he often partners up with on bathroom renovations. Adam started up a Whatsapp Group where we were able to share what look and style we were after and what products we wanted to install. They both advised what would and wouldn’t work, offered solutions and double-checked our final orders to ensure we had everything we needed to begin works. They were efficient, obviously took pride in their work and were lovely to work with - we’ve already got them booked in to start work on the family bathroom in April.
Always be prepared for something to go wrong. The dodgy builder we bought the home off of had installed a ceiling extractor fan that wasn’t connected to anything and meant all the moisture was just going into the roof’s void or staying in the room itself! Not great for mould and humidity! Thankfully Adam and Roy came up with a solution to move the extractor fan onto an exterior wall.
Order and check all your deliveries for breakages and damage and make sure you leave enough time for redeliveries. We had to have both our basin and shower enclosure replaced as they were damaged when we unpacked them. Thankfully it was quick and easy to get the replacements.
If your old bathroom items are in reasonable condition, consider selling them or giving them away. We managed to give away the bathroom tiles, an old vanity unit, toilet and shower on Facebook Marketplace for Free - which meant we didn’t have to do a dump run and avoided contributing towards landfill!
PRODUCT LIST
Wall & ceiling paint Setting Plaster, Farrow & Ball
Floor tiles Terrazzo Nouveau Ivory matt porcelain tile, Mandarin Stone
Shower & sink tiles Hoxton Bottle Green Gloss porcelain tiles, Mandarin Stone
Shower Multifunction Thermostatic Shower Kit, Crosswater
Shower enclosure Hudson Reed Apex Matt Black Quadrant Shower Enclosure, Victorian Plumbing
Shower tray Mira Flight Low Quadrant Shower Tray, Victorian Plumbing
WC Boston Rimless Fully Back To Wall Close Coupled Toilet With Premium Soft Close Seat, Bathroom Mountain
Basin Arezzo fluted matt white round countertop basin, Victorian Plumbing
Tap Drift Tall Basin Mono with clicker waste, Crosswater
Vanity unit Stag 1950’s cabinet, Crystal Palace Antiques
Vanity unit worktop, Quartz offcut, Marbles Ltd
Radiator Milano Aruba Black Horizontal Designer Radiator single panel, Best Heating
Door handles, Black Hepworth internal door handles, Dowsing & Reynolds
Did we manage to finish the project before our guests arrive, I hear you ask? Well, we’ve still got a fair few bits to sort out in the master bedroom, including installing the curtains and choosing art for the wall and I need to pick a fabric for a roller blind in the en suite, but we managed to finish it near enough, with the last coat of paint applied the night before our friend’s arrived. It was a hectic 4 weeks, I don’t think I started my Christmas shopping until 21st December and, in hindsight, I wouldn’t recommend starting a room makeover if you’re under a time constraint, but I’m glad we’ve finally made a start on our house reno.
Don’t forget to subscribe to ensure you don’t miss the next part of the series, where I’ll be showcasing my youngest daughter Lily’s bedroom makeover in collaboration with YesColours.