


My renovation: How we turned our daughter’s room from a beige box into a kaleidoscopic, fun-filled space
In part 2 of Sophie’s home renovation series, she reveals how she transformed Lily’s bedroom with bold paint shades and even had a go at DIY flooring

After finishing the master en suite, next on the house reno list was my youngest daughter Lily’s bedroom. The space, which used to be my eldest daughter Ada’s room, hadn't been touched since we moved in in 2016, when my husband Charlie and I simply added a wallpapered feature wall to complement the neutral coloured walls and carpets that had been fitted before we bought the house. To be frank, I never really liked the wallpaper – it was a rash decision during a post pregnancy fog – and, when paired with the orange-hued pine furniture – which I had in my bedroom growing up – it just looked really dated and soulless. But with work, family life and budget getting in the way we just left it as it was.


Fast forward 8 years, we finally decided to give the room a much-deserved makeover. Sticking to a low budget was key, as was adding lots of colour and interest.
Choose a fun colour scheme
Paint is one of the most impactful ways to update a room, and choosing the right colours can really make (or break) a space. So when I was offered the chance to work with paint brand Yes Colours as part of a PR collaboration to choose a colour plan for Lily’s room, I jumped at the chance.
I booked an online personalised colour consultation with the lovely colour expert Emily Harnasz at Yes Colours. She really understood my vision and yet her expert input and advice helped me step out of my comfort zone and encouraged me to go one step further by adding no less than six different bright hues to Lily’s bedroom space.
Before my video consultation, I emailed Emily some photos of accessories that I knew we wanted to use in Lily’s bedroom (a pom pom garland and a couple of framed prints), along with a brief outline of what we wanted to create – which was fundamentally a fun bedroom space for our three year old!
During the meeting, Emily and I discussed the size of the room, where natural light enters the space, what furniture we would be using and what Lily’s personality is like. Emily was amazing at listening to the brief and coming up with some colour options, picking out accent colours from the accessories. We decided to test out seven colours – Joyful Pink; Passionate Lilac; Passionate Yellow; Passionate Warm White; Joyful Aqua; Electric Mint Green and Mellow Yellow.


As soon as the samples arrived, Lily (with some help from her older sister Ada) got to work painting the swatches onto lining paper, which we then hung up on her bedroom wall for a couple of weeks to see how they looked at different times of the day. It also gave Lily some creative input, which I think is really important when designing kid’s spaces.
I then had a quick follow-up conversation with Emily where we discussed Lily’s colour choices (turns out, Lily LIKES colour!) and Emily shared her expert advice on the final selection, where to place the colours in the room and advised on the finishes and quantities needed – all of which she emailed to me in a written report.
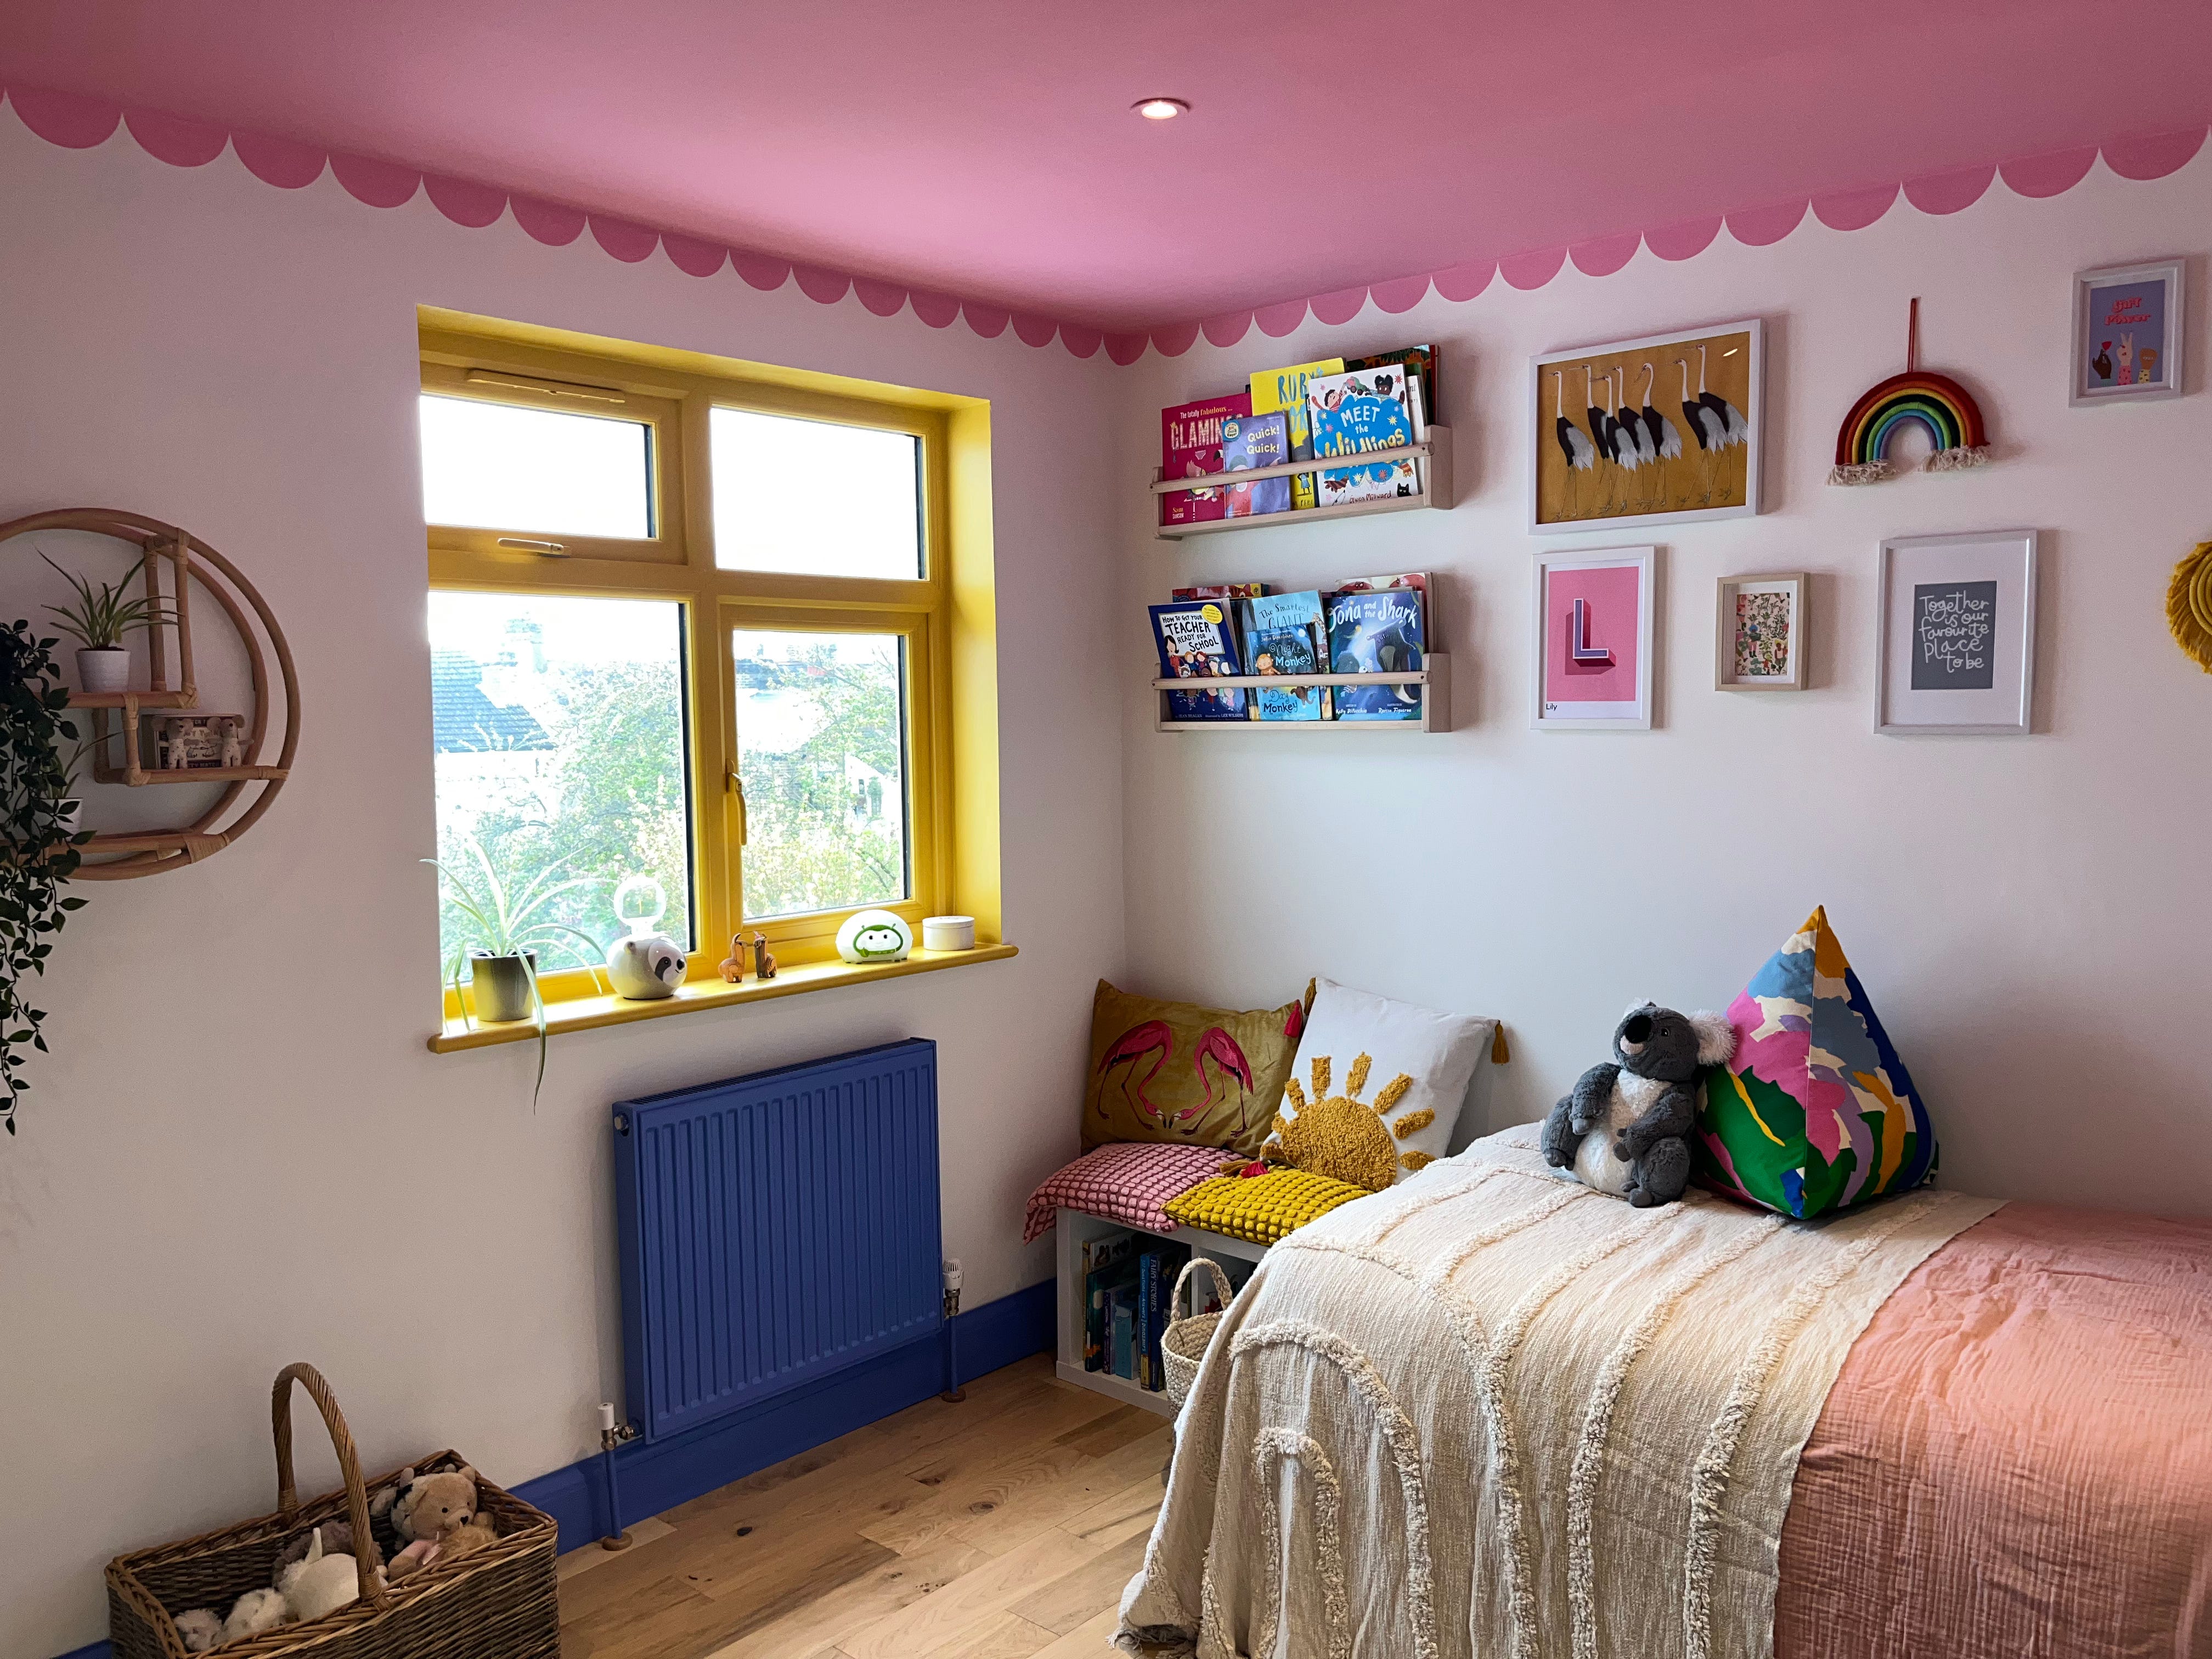
We went with Passionate Lilac for wood and metal work; Mellow Yellow for the window and recess; Joyful Pink for the ceiling; Passionate Warm White for the walls; Electric Mint Green for low furniture and Joyful Aqua for tall furniture.
Upcycle and reuse


Rather than buy new furniture, we decided to give my childhood pine wardrobe, chest of drawers and bedside table a new lease of life by painting them. Being over 30 years old, the furniture was in surprisingly good condition. The only thing we didn’t like about them was that aging had caused the pine to grow orange in tone. We started by sanding down the woodwork, filling in any gaps with a wood filler and then wiping them down to ensure all the grime, dust and dirt had been removed. Then we applied a Zinsser primer to help the paint colour adhere to the woodwork and ensure a longer-lasting finish and, once dry, painted the chest of drawers and bedside table in YesColours’ Mint Green and the wardrobe in Joyful Aqua – both in an eggshell finish.
We framed old birthday cards and prints from outdated wall calendars, rather than buy all new prints, as well as upcycled cheap Ikea frames that we already had in the home with bobbins bought off Amazon. We also painted the existing radiator and skirting boards, giving both a new lease of life and scoured B&M, Dunelm and Ikea for low-cost décor and accessories.
Fit your own flooring to save money
I hate carpet – there I said it! I can appreciate the benefits of a soft sumptuous carpet underfoot, but I hate how difficult it is to keep clean and free from stains – especially when you have little ones!


I love the versatility of wood flooring. I know it’s likely to scratch and mark, but the material can be sanded and refinished multiple times. Solid wood was out of our budget, so we went with engineered oak flooring from Direct Wood Flooring, which we managed to buy in the January sales, costing us approximately £600 including underlay and delivery for an 11 sqm room. So when we were quoted £400 to fit the flooring from a local contractor, I decided to have a go myself. With the unexpected help of my husband (I think he got a little jealous that I got to play with the circular saw while he was busy working away in our home office), we were able to fit the flooring within 2 days. I’m not going to lie, it was exhausting! And there were a few tricky moments – one of which was when our multi-tool decided to stop working. But when we got into the swing of it, everything clicked (pun intended) into place! PLUS, we’ve already had a red nail varnish spillage, which was easy to remove using a non-acetone nail polish remover – something that would have been impossible to get out of carpet! We’ll probably add a rug to soften the hard flooring at some point.
Would you have a go at fitting your own flooring? DM us or let us know if you want a step-by-step tutorial by commenting below.
Give fixtures a new lease of life

Replacing windows wasn’t really an option, especially as our UPVC windows are in good condition. So we decided to paint them instead after being inspired by Instagrammer and influencer Heather Craig. Much like woodwork, we cleaned the windows, and then taped the edges using Frogtape for a straight finish and to ensure the paint didn’t seep onto the glass. Then I applied a Zinsser primer and painted the plastic frame in YesColour’s Mellow Yellow, adding 3 coats. We love the finished look, and think it really helps to define the window area and recess. And when the sun shines, it reflects a cheery bright yellow tone onto the white bedroom walls.
The final verdict


Lily loves her new bedroom and we’re so glad we had the opportunity to work with Yes Colours. It’s one of the nicest paint brands I’ve ever used. Not only are the colour options spot on, but the paint comes in recyclable pouches that are easy to pour, and the paint itself glides onto the wall effortlessly. Plus, it’s super easy to clean off of paint brushes and trays after use. The room isn’t entirely finished yet (are makeovers ever truly complete?) as we’ve got to choose a fabric for the window blinds and I want to box in the Ikea Kallax unit to create a built-in reading nook below the shelving, but that hasn’t stopped Lily from moving into her new room and enjoying her new space.
Don’t forget to subscribe to ensure you don’t miss the next part of the series, where I’ll be showcasing the kid’s bathroom makeover.